
In this article I give you a run down on Amazon coupon codes and also provide a step by step guide on how to create coupon codes in SellerCentral.
Let’s hop right on in:
There are two types of Amazon coupon codes. Single Use Codes and Standard Coupon Codes.
Single Use Codes vs. Standard Coupon Codes
I want to take a minute to quickly explain the difference between single use coupons and regular coupons on Amazon.
Single Use Codes: These are codes that can only be used one time. That means once it the code has been used no one else can use it again. These types of codes are useful when you want to limit the distribution of a code.
Standard Coupon Codes: These coupons are available for anyone to use. You create one coupon code and anyone can use it for a discount on your product. This is risky as anyone who gets the code can claim a discount. If we are offers large discounts we strongly recommend you do not use these coupon codes.
How to Create Single Use Coupon Codes
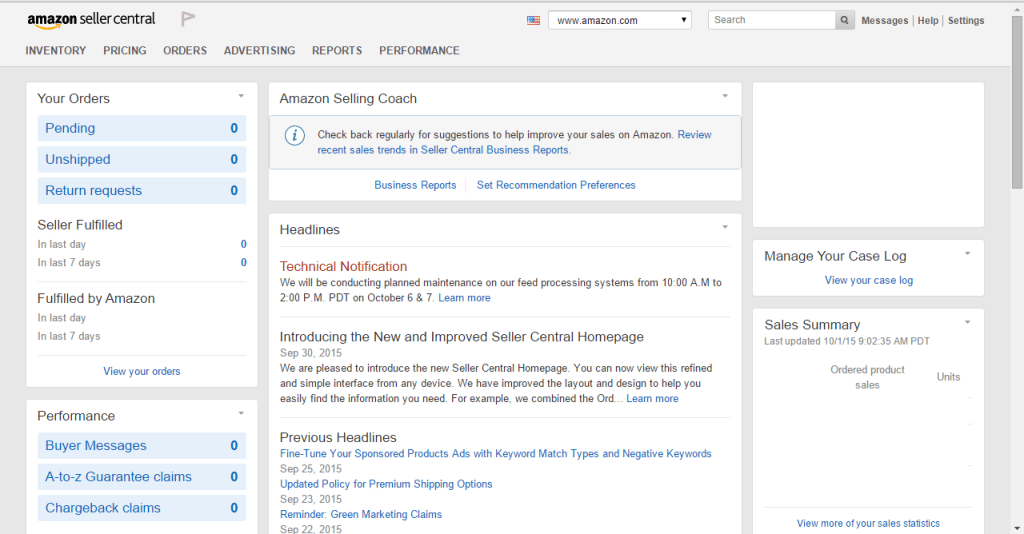
1. Go to your Amazon Seller’s Account Homepage
First, you need to be inside your sellers account and on the homepage, see below:
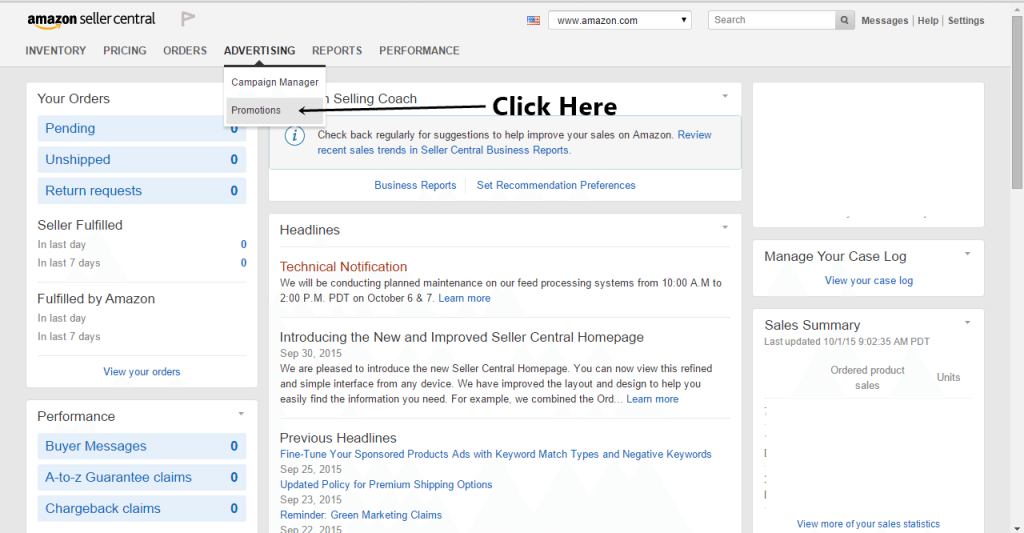
2. Go to the “Promotions” Page
From the homepage, click on “Advertising” then “Promotions” on the top navigation bar. This will take you to the promotion page.
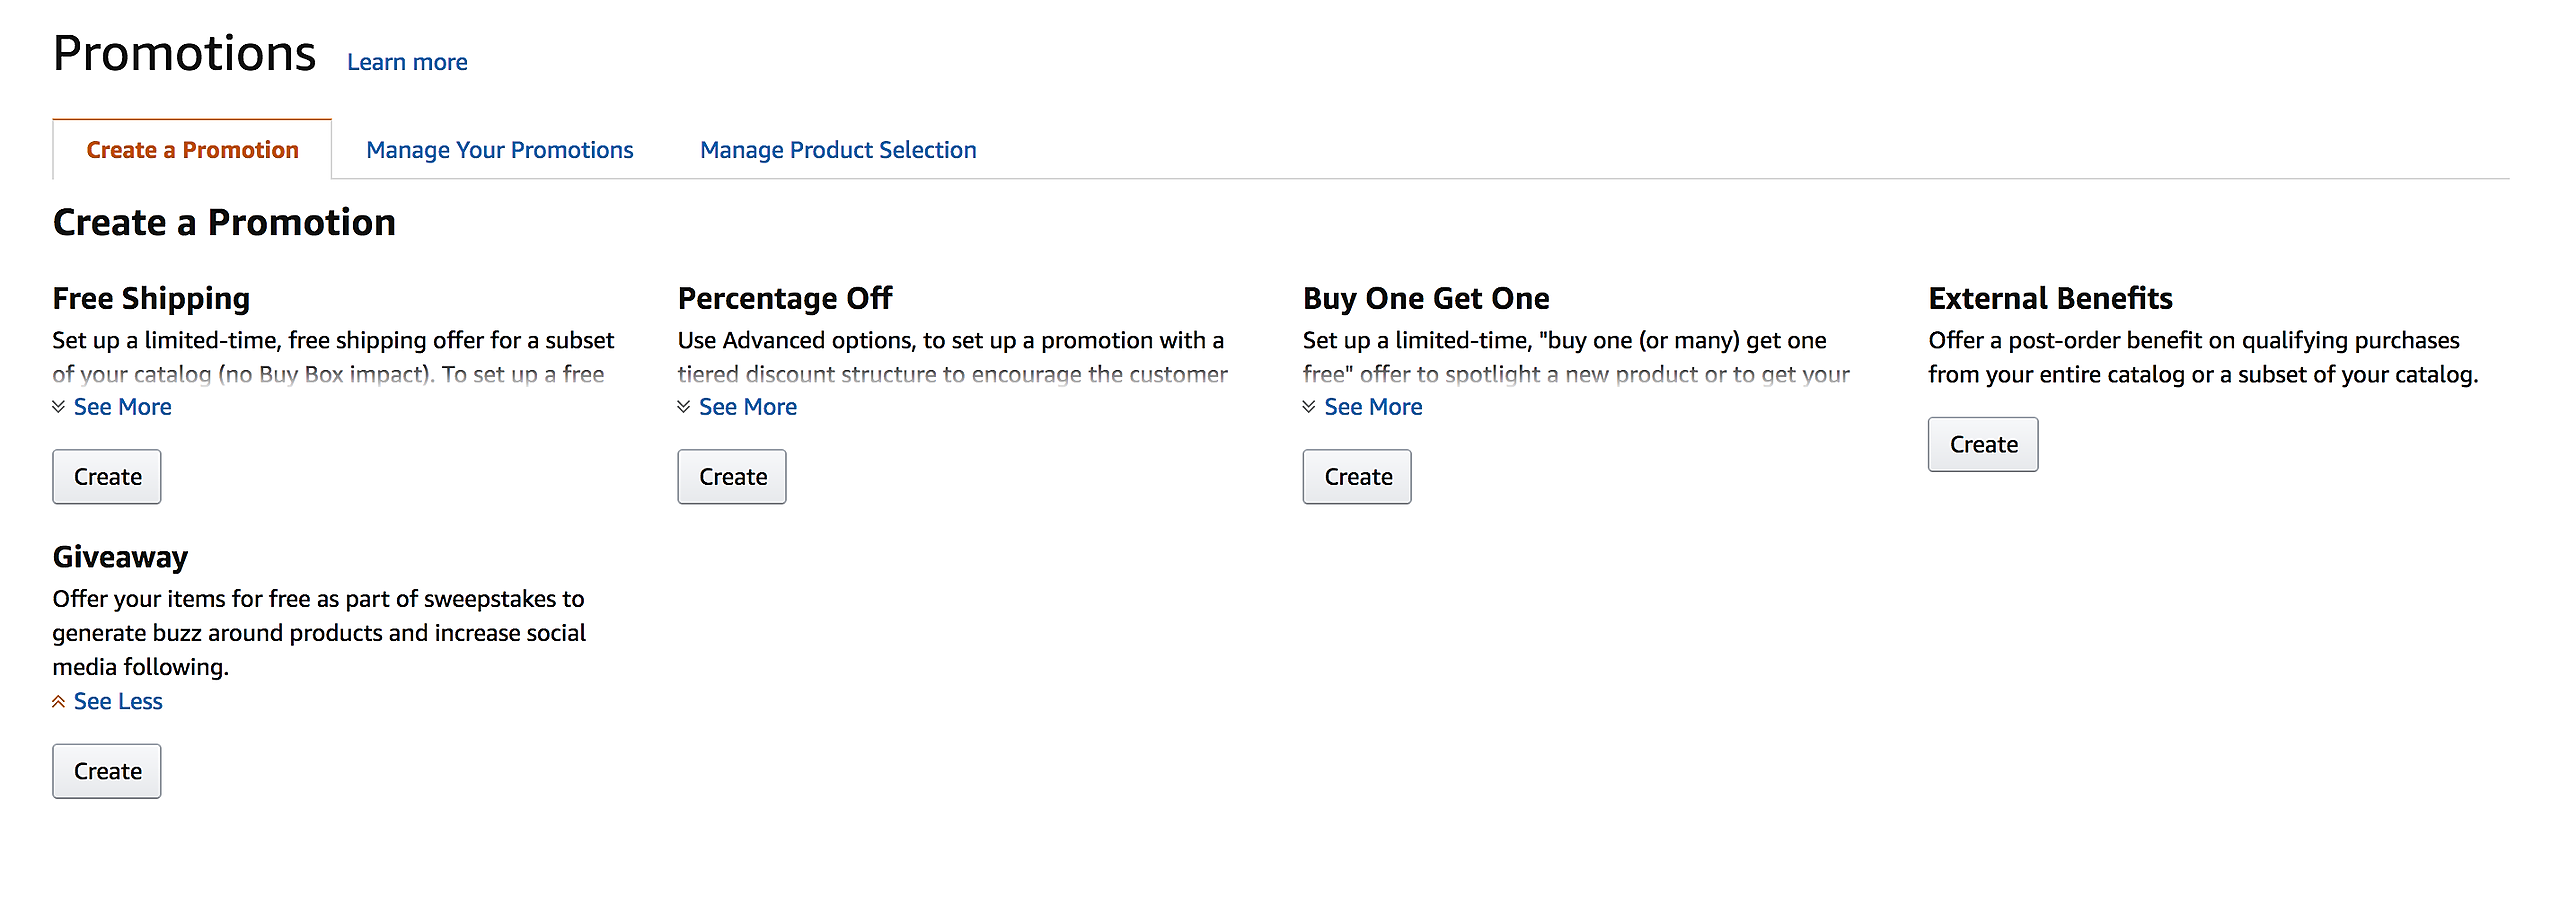
3. Choose the “Percentage Off” Option
Next, you will see a couple different options to choose from. For single use codes and just about everything else you will need, choose the “Percentage Off” option.
4. Fill out the Page
I am going to breakdown each section of this page as this is where all of the most important information is needed.
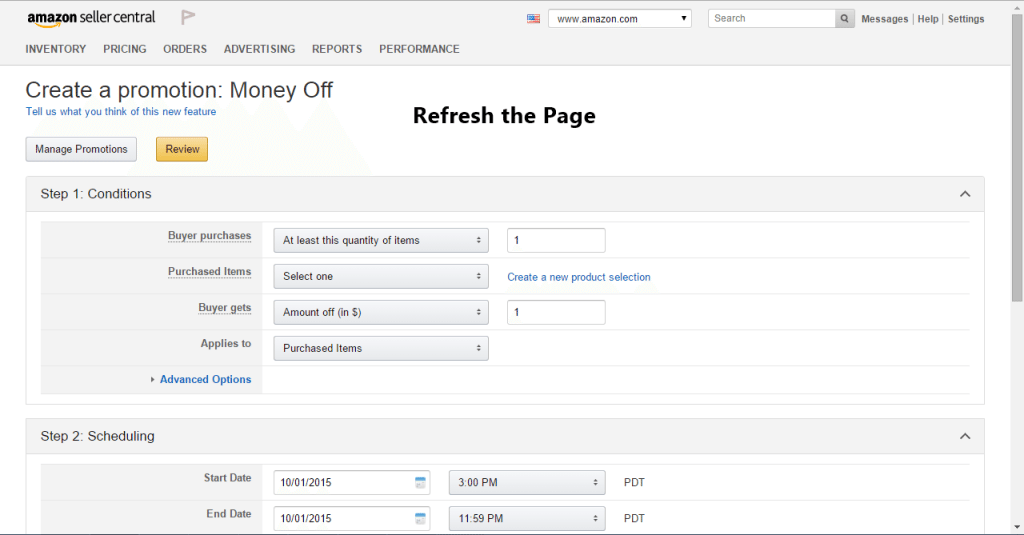
Before we get started, you should see a page like the one below:
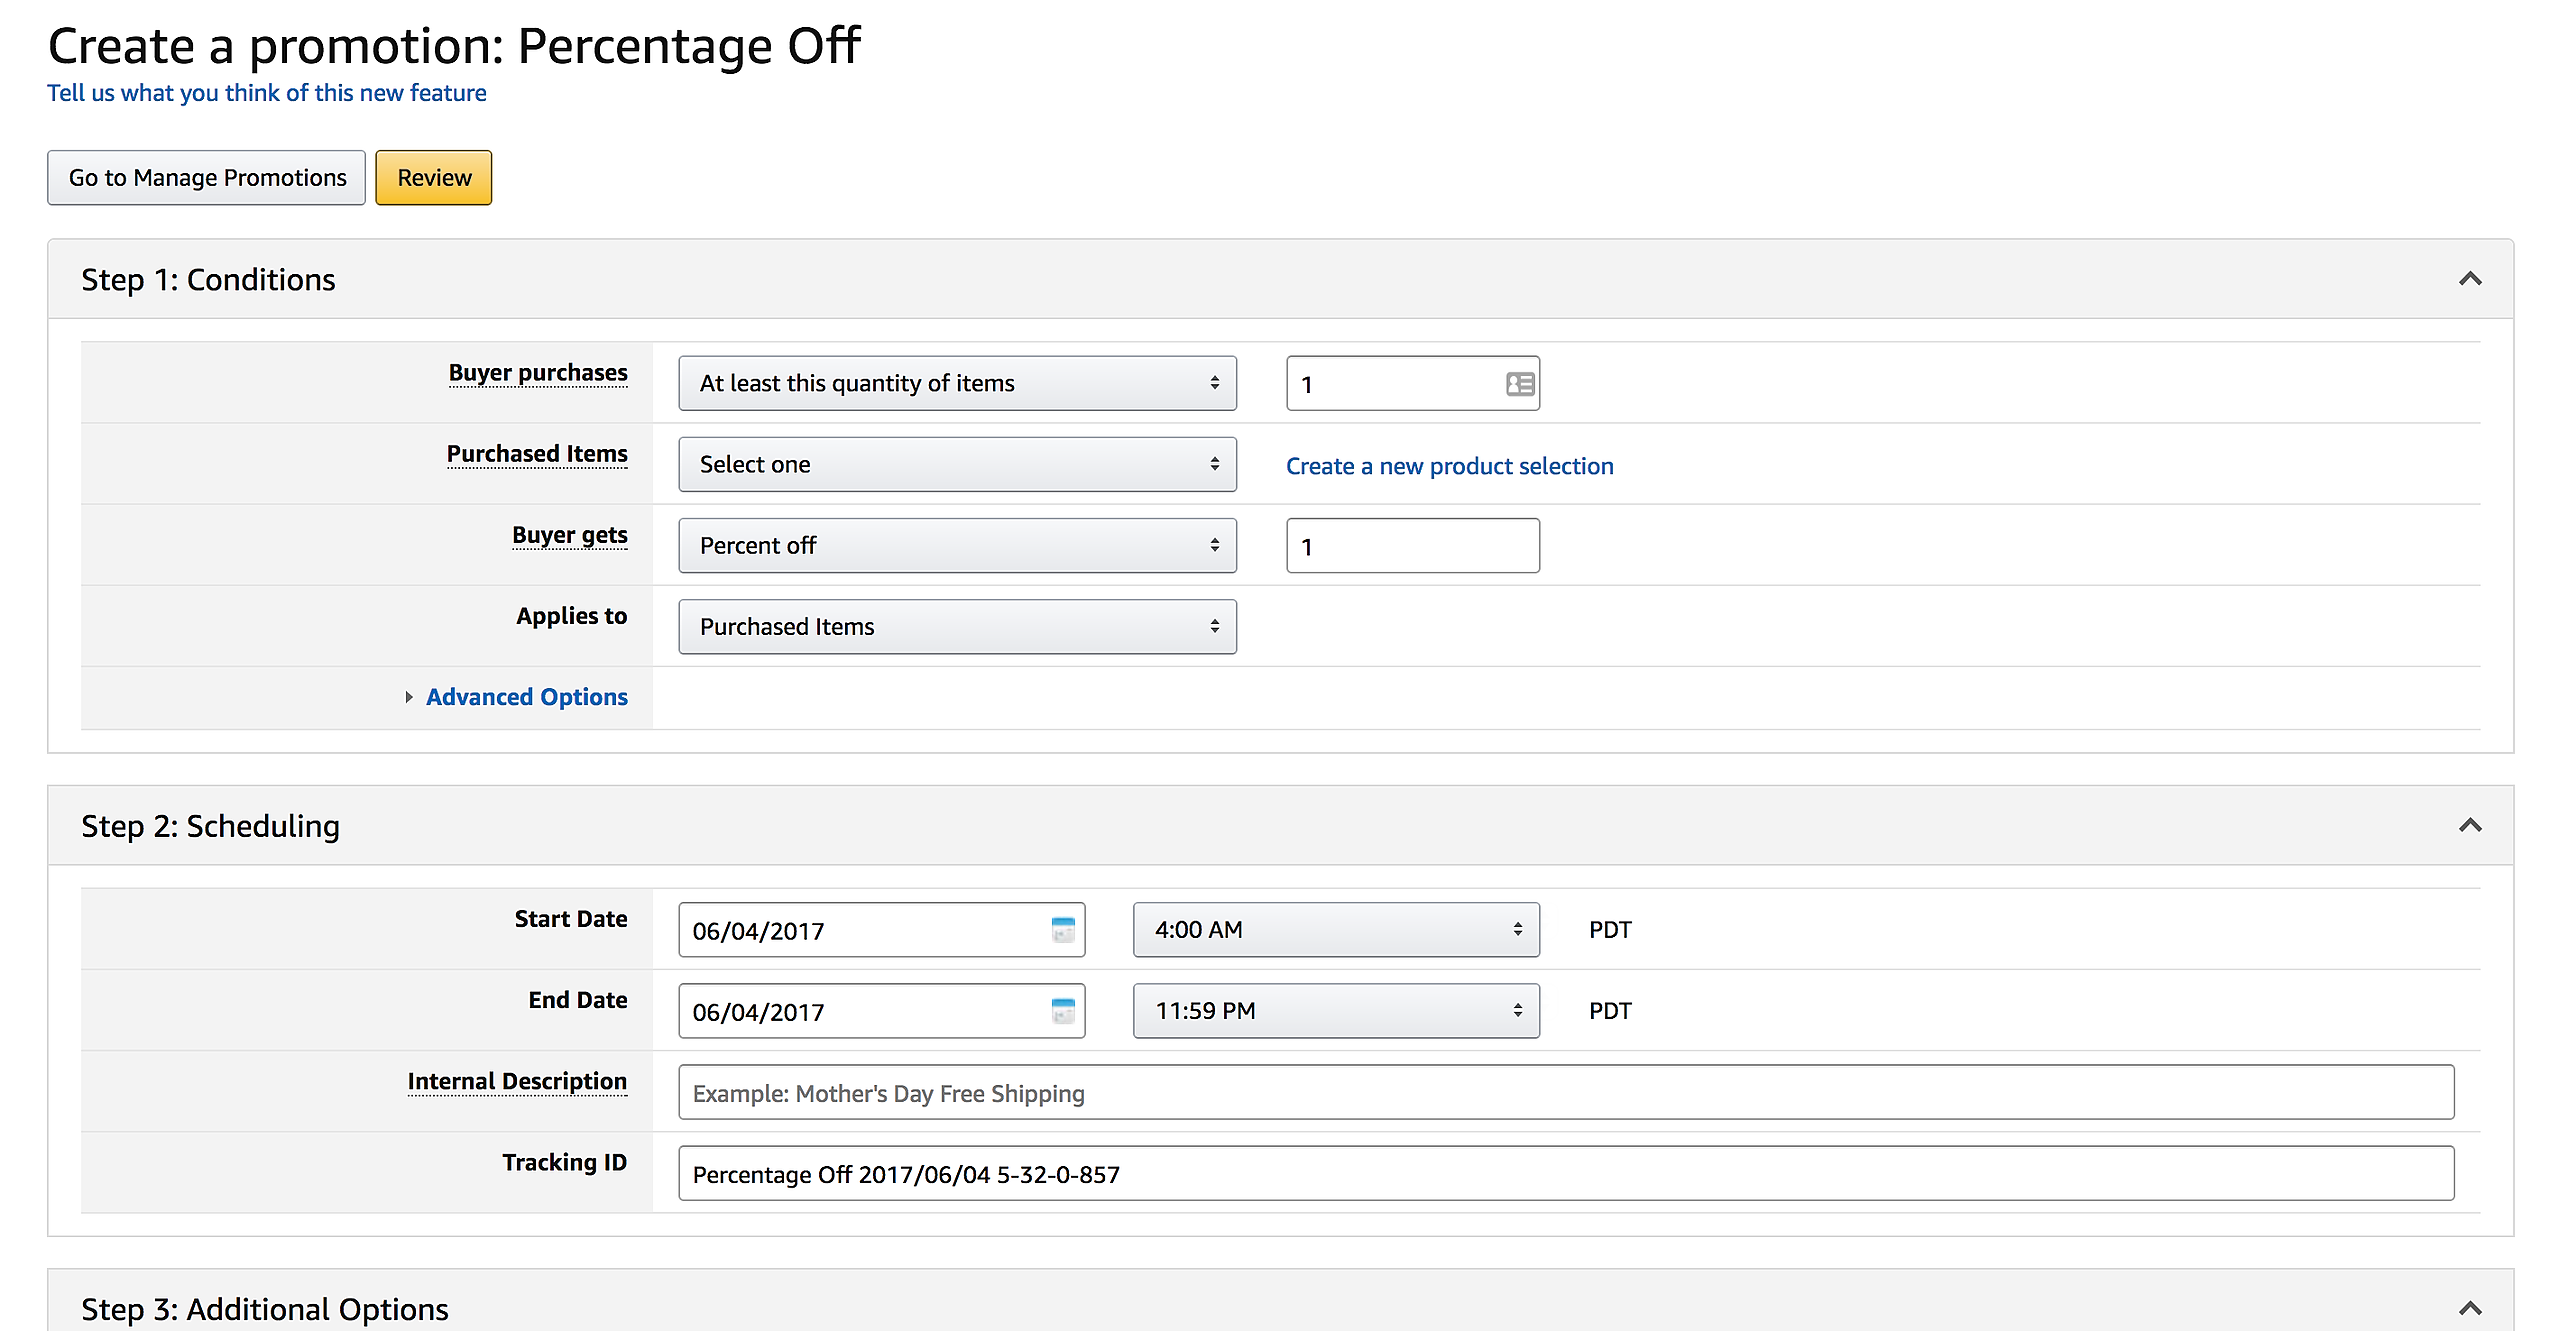
5. “Conditions” Section
The first section we will talk about is the conditions section.
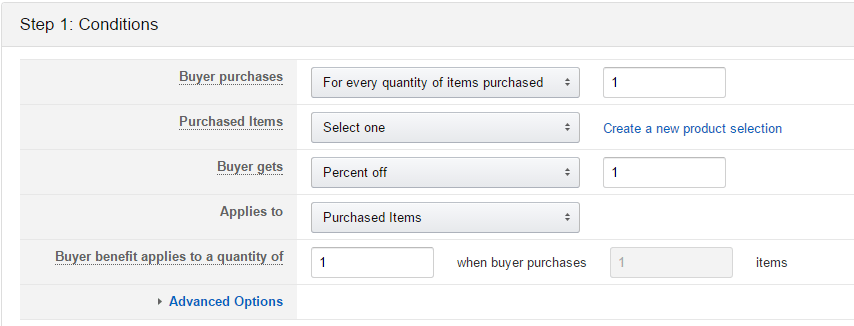
Buyer Purchases: This is what the buyer must do to get this promotion. I would leave it as-is with the “At least this quantity of items” to 1.
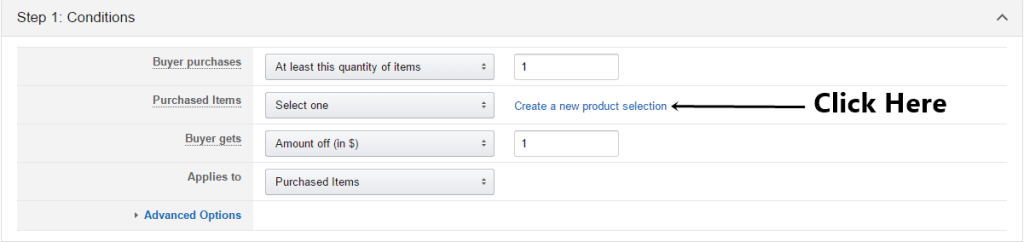
Purchased Items: This part is important. You are going to have to create a new product selection, you have to click on the blue link right next to it. Follow the steps below:
Click on the link:
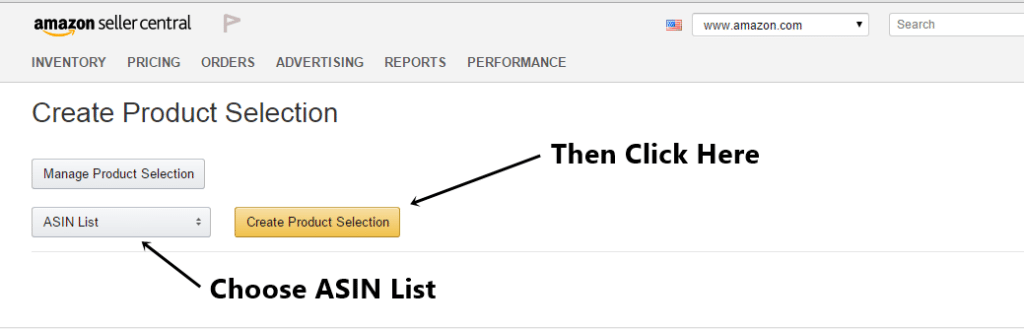
Choose “ASIN List” from the drop down menu and click “Create Product Selection”:
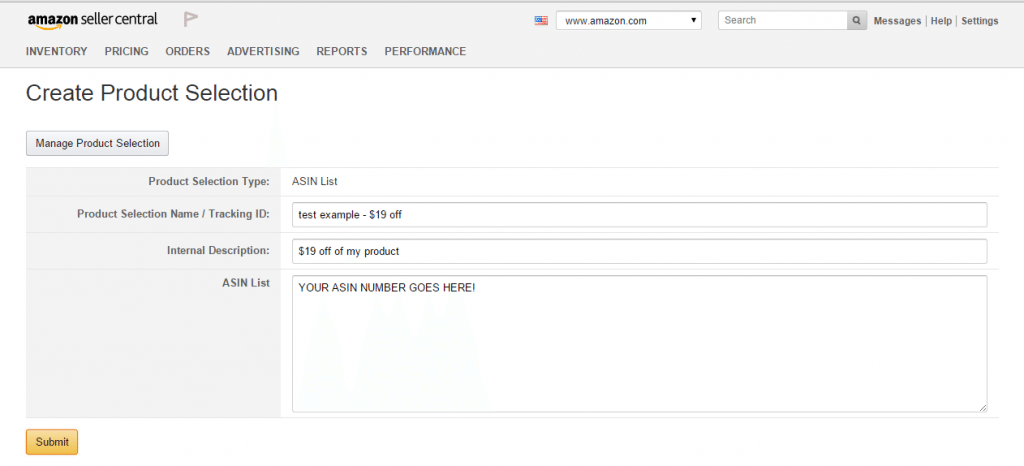
Fill out the next page. The first two slots are for your tracking purposes only and name them what you would like. In the “ASIN List” section, input the ASIN number of the product you want to run the promo for.
You should then see a success notification:

Now, go back to the page below and click refresh in your browser:
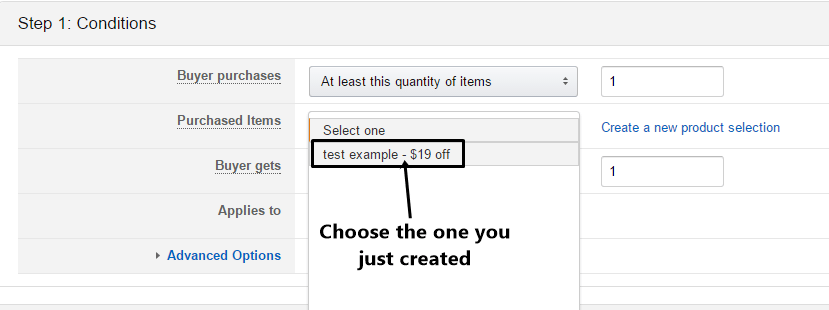
Next, choose the product selection that you just created from the drop down menu:
Buyers Gets: In this section, you need to decide how much you want to discount your product for this promo. Previously you could select $ off and % off. Unfortunately Amazon removed the $ off option.
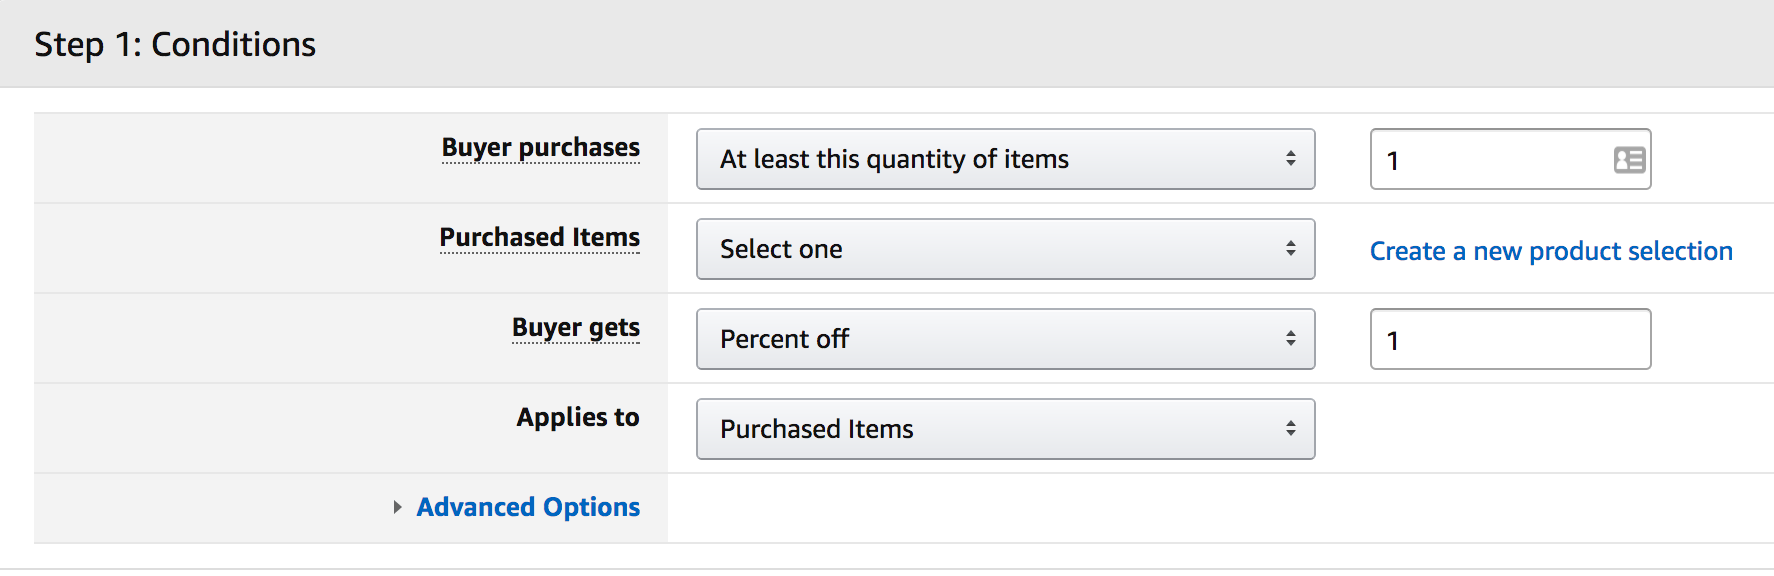
Applies to: This is where you choose what this discount applies to. I would stick with the “Purchased Items” selection.
Advanced Options: Leave as-is
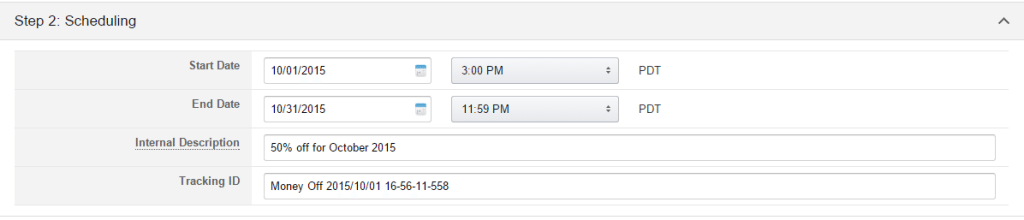
6. “Scheduling” Section
The next section will be the setting for the scheduling aspect of this coupon/promo:
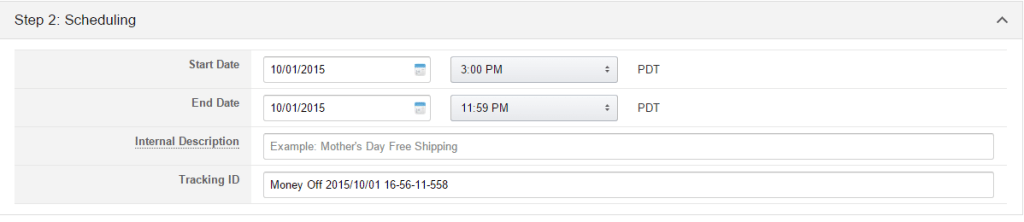
Start Date: This is where you choose what date the promo code becomes active. You can click on the calendar icon and then click on the day you want to start.
NOTE: It takes 4 hours from the point you create the coupon code to become active no matter what time you choose here, keep that in mind
End Date: This is where you choose when you want to end the promo.
Internal Description: Name your promo code. Name it something that you will be able to recognize later on.
Tracking ID: I would leave this as-is
Here is what my section looks like for me example promo:
7. “Additional Options” Section
This last part is probably the most important because this is where you choose who get’s to use the coupon code. This is what it looks like:

Claim Code: We recommend you select Single-use if you want to run promotions in Landing Page Promoter. This is the safest option as you get to control how many coupon codes are claimed.
One Redemption per Customer: Check this box.
Claim Code: This is the code people will enter to get the discount, however, since we are creating single use codes this claim code then this option won't be enabled.
Claim Code Combinability: Choose the “Exclusive Option”.
Custom Messaging: This is not applicable with Single Use coupons.
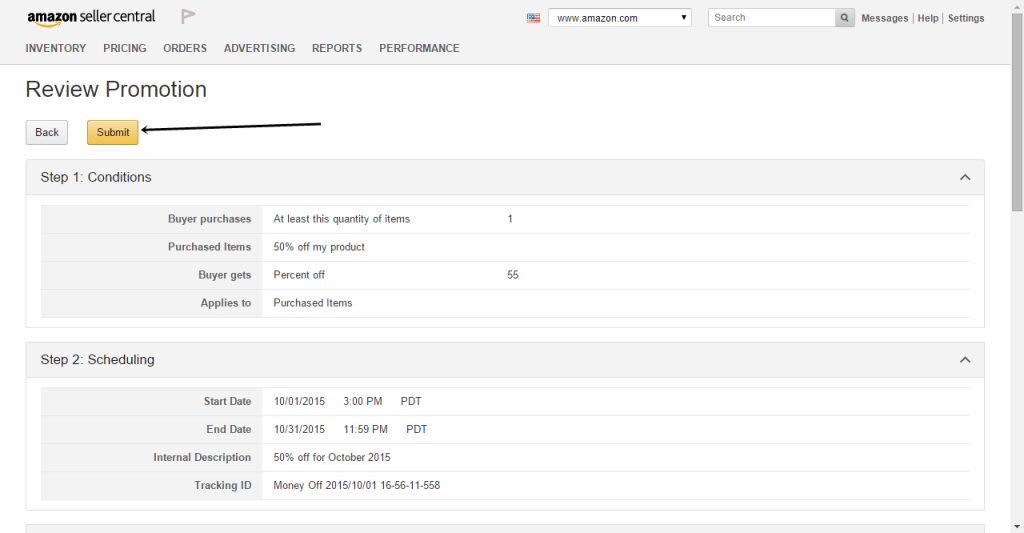
Scroll down to the bottom of the page and click on the “Review” button:
8. Confirm the Settings
On the next page, you will need to review all of the setting and make sure everything looks correct. If it does, you can click on the “Submit” button:
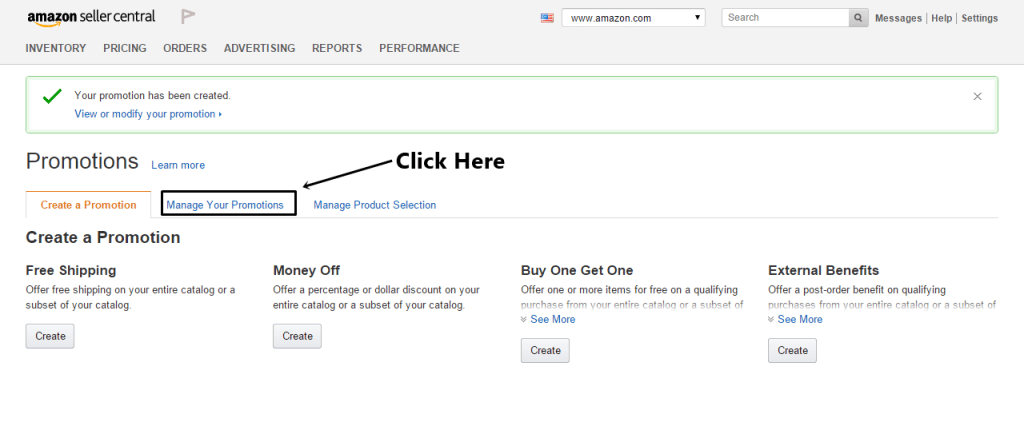
9. Go to “Manage Promotions”
Now that you created the promo, you need to now create the single use codes. To do this, click on the “Manage Promotions” tab:
You should now see a page that looks like the one below. To be able to view your promotion, click on the “Promotion Status” and choose “All”:
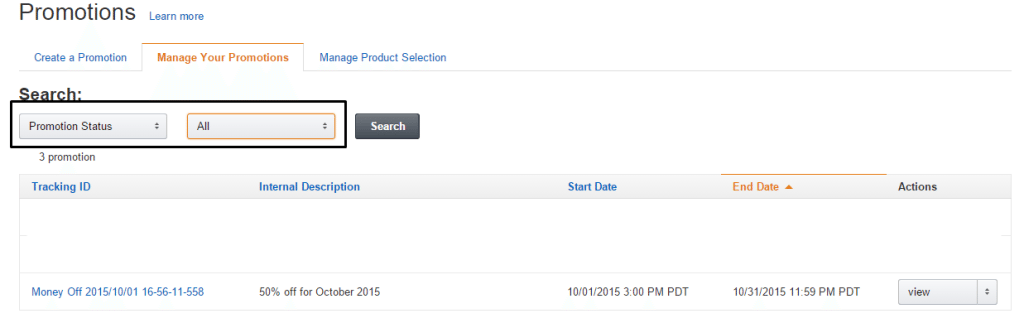
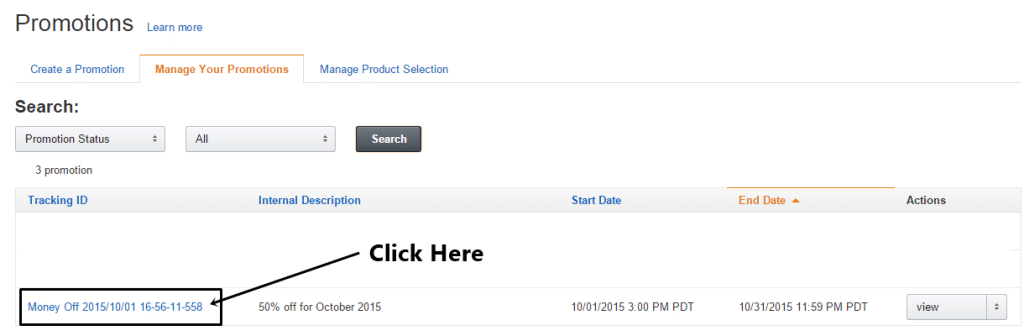
10. Click on Tracking ID
Now that you see the promo that you just created, click on the “Tracking ID” for this promo:
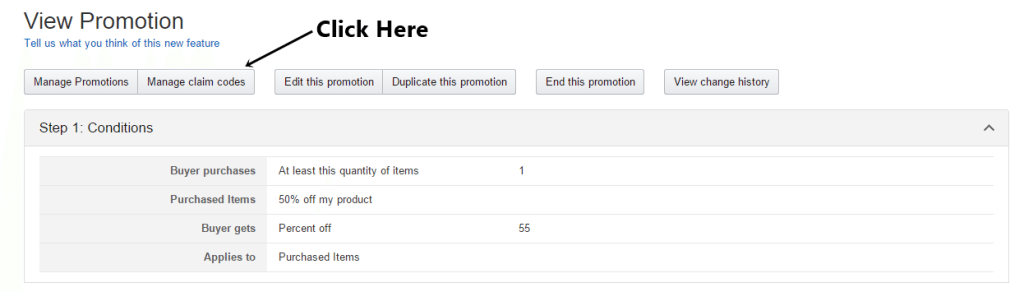
11. Manage Claim Codes
That should take you to a new page. From this page, click on the button that says “Manage Claim Codes”
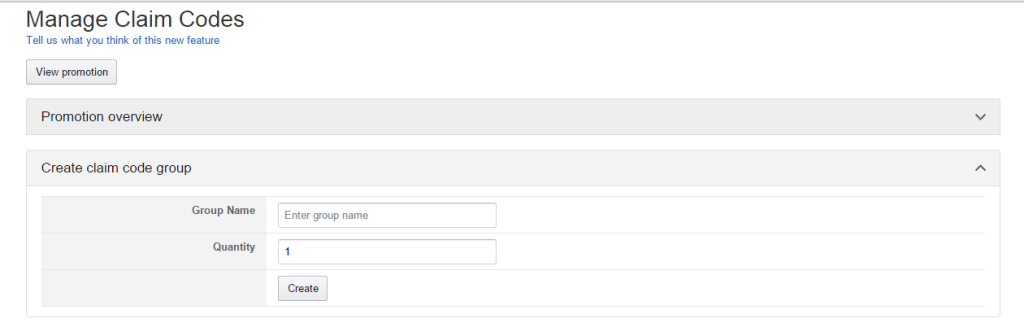
12. Create Claim Code Group
We are almost done!
You should see a page like the one below:
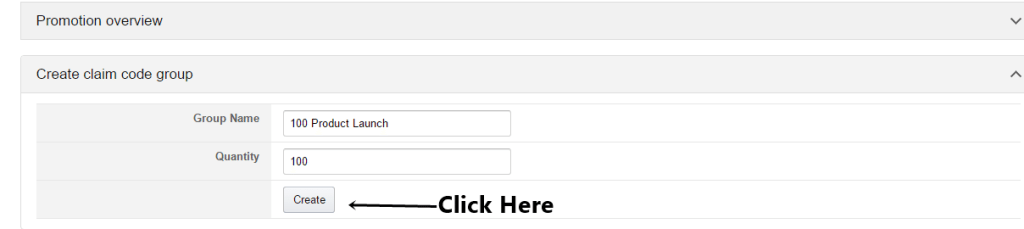
Group Name: Name this something that relates to why you are using these codes. If I was doing a 100 product launch I would name it “100 Product Launch Codes”
Quantity: If you were doing a 100 product launch, then create 100 single use codes. This make sure that the maximum amount of codes that can be used is 100. This keeps you and your product safe from your coupon codes getting into the wrong hands.
Once you are done, click “Create”:
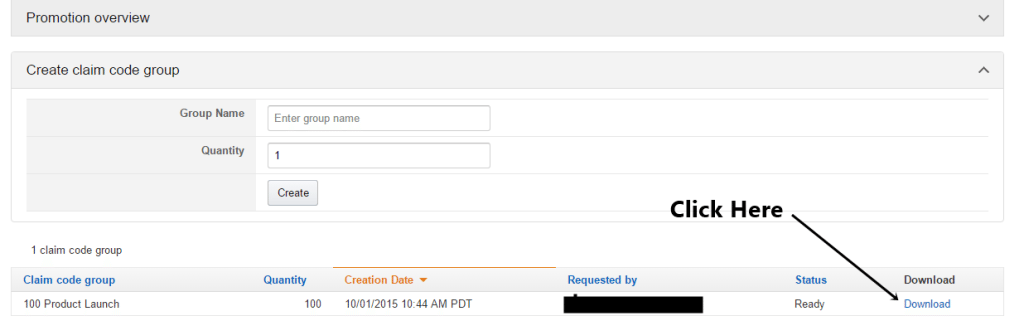
13. Download Codes
Now you need to download these codes and save them somewhere. Click on the download link:
14. Upload codes into Landing Page Promoter
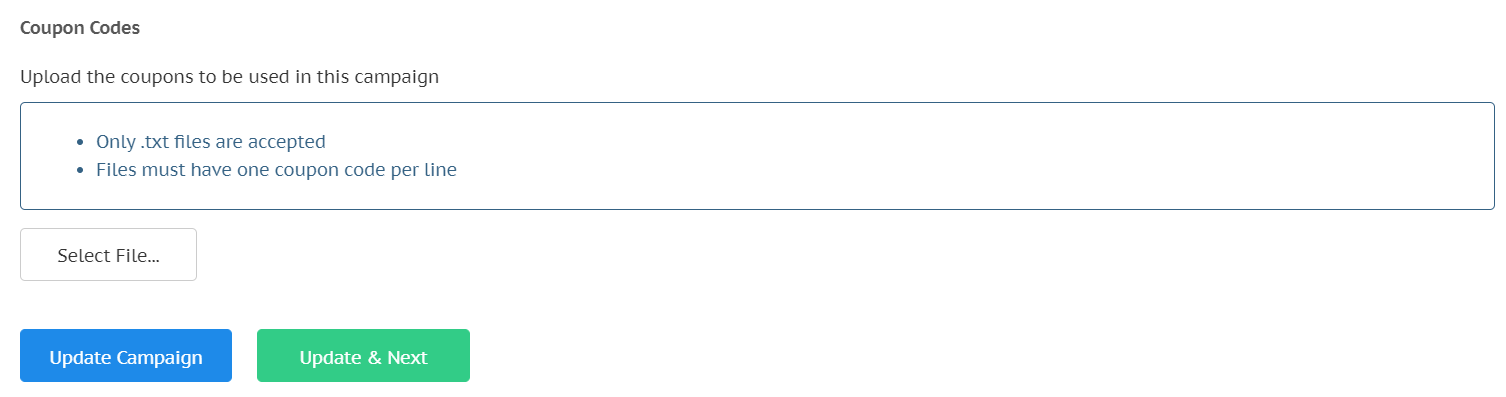
In the campaign wizard under the Coupons tab press Select File and then locate the txt document that holds your coupon codes. Press submit and then you are done!
NOTE: When you download your coupon codes from Amazon they will come in a .zip file. You must extract the .txt in this .zip file before uploading your coupon codes to Landing Page Promoter.
Conclusion
You now have single use codes that you can use with Landing Page Promoter to promote your product!